
“Viva Grass Planner”: Organization’s account configuration
Every organization which uses “Viva Grass Planner” gets their own customizable system environment. The organization can manage users, adopt grassland data model, add additional grassland attributes, manage the list of context data layers, add new layers, etc. This module provides a set of data management tools for fast and efficient organization’s data preparation. These tools allow to enrich grassland data with prepared data from „LIFE Viva Grass“ project, ecosystem service values, estimations and recommendations. This module can be used as an organization’s cloud based GIS platform to collect, store, manage and analyse grassland data. The “Viva Grass Planner” enables the user to carry out advanced prioritization and classification functions, to visualize the results in a map as well as to export the processed data.
Spatial data preparation
Viva Grass Planner >> More
-
Download organization’s land use blocks and context data layer structure
Viva Grass Planner >> more >> Settings >> Download organization data

When downloading data from “Viva Grass Planner” you get not only information, but data model, structure in Esri shape file format. All data user has and wants to use for a analysis or collection in the Tool should be uploaded to the structure and uploaded to the Organization’s “Viva Grass Planner” account.
Important: data structure can’t be changed while adding data to it.
Land use blocks layer attributes (without custom attributes):
Field name |
Field alias |
Data type |
| objectid | OBJECTID | Object ID |
| block_id | BLOCK ID | Integer |
| category | Grassland category | Text |
| ranimals | Reared animals and their outputs ESS | Double |
| fodder | Fodder ESS | Double |
| biomeng | Biomass-based energy sources | Double |
| herbs | Herbs for medicine | Double |
| ercontr | Control of (water) erosion rates | Double |
| habitm | Maintaining habitats | Double |
| weatng | Weathering processes/soil fertility | Double |
| chc | Chemical condition of freshwaters | Double |
| climate | Global climate regulation | Double |
| cucrops | Cultivated crops | Double |
| biorm | Bio-remediation by micro-organisms | Double |
| accum | Filtration/storage/accumulation by ecosystems | Double |
| pollin | Pollination and seed dispersal | Double |
| country_c | Country code | Text |
| munic_c | Municipality code | Text |
| cultg_e | Educational CS | Double |
| cultg_h | Cultural heritage CS | Double |
| cultg_ae | Aesthetics CS | Double |
| cultg_p | Physical CS | Double |
| bprod | Bundle production | Long |
| bhab | Bundle habitat | Long |
| bsoil | Bundle soil | Long |
| n2000 | Natura 2000 category | Text |
| ownerorg | ownerorg | Text |
| created_date | created_date | Date |
| last_edited_date | last_edited_date | Date |
| globalid | globalid | esriFieldTypeGlobalID |
| slopecat | Slope category | Text |
| soilfcat | Soil category | Text |
| natcat | Land category | Text |
| ownergid | Owner ID | GUID |
| tprod | Trade-off production | Long |
| thab | Trade-off habitat | Long |
| hotcold | Hot cold spots | Long |
Context data layers:
- Valuable objects
- Dangerous objects
- Custom point layer
- Protected species
- Tourism infrastructure
- Cultural heritage points
- Farms
- Invasive species
- Nature objects
- Rivers
- Roads
- Tourism infrastructure lines
- Cultural heritage lines
- Custom line layer
- Nature objects line
- Protected areas
- Custom polygon layer
- Protected species (areas)
- Risk of abandonment zones
- Rivers (polygons)
- Roads (polygons)
- Tourism infrastructure polygons
- Cultural heritage polygons
- Flood zones
- Green network
- Habitats
- Invasive species polygons
- Natura 2000
- Nature objects polygon
Land use blocks and ES value data from Viva Grass basemap
v
User can download land use blocks from Viva Grass basemap. This data contains ES values, other pre-calculated values and derived data attributes, etc. This helps to get initial data set for needed territory and to start ES assessment faster.
Viva Grass Planner >> More >> Settings >> Download data from basemap

- Define territory to download data:
- Draw on map
- Upload Esri shape file
Important: user defined territory, polygon is very important data element, as it is used to upload and update data in organization’s account. When uploading data with provided “user area” info, first of all data in the organization’s account inside the provided “user area” will be deleted and then new data will be uploaded instead.
Important: all data prepared for the upload should be in coordinate system: WGS 84 (WGS_1984_Web_Mercator_Auxiliary_Sphere)
- Submit request for data package preparation
- Download data package

Data preparation in ArcGIS for Desktop (or other GIS tool)
● Land use block data preparation in ArcGIS for Desktop
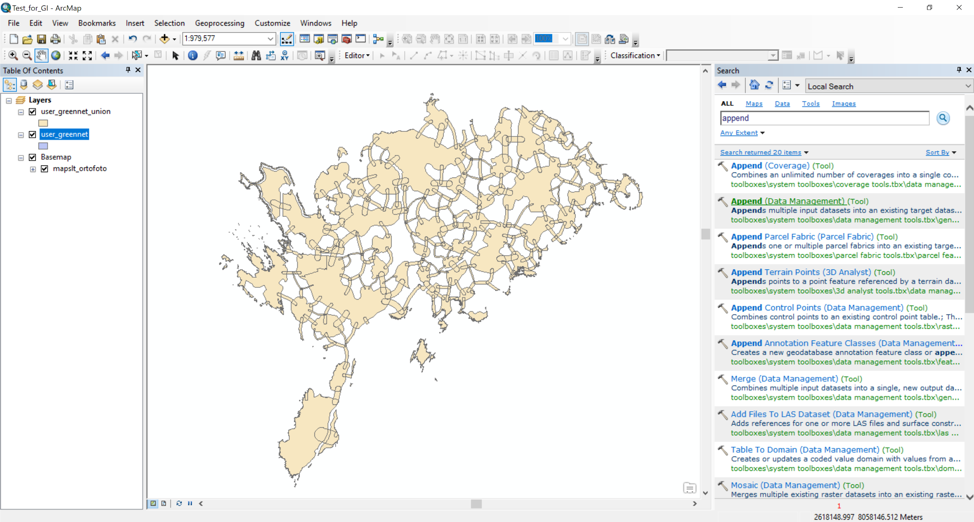
Once you have downloaded the data structure you can fill it in with your own data on ArcGIS for Desktop (or other GIS tool). For filling in the data structure, “Append” tool in ArcGIS for Desktop is used. Below you can see an example how to work with the “Append” tool:
- Input dataset: insert your own shape file. In this example we use a shape file “user_greennet_union”, which contains plots of Green Network of Saaremaa island in Estonia.
- Target dataset: insert a shape file from the downloaded data structure from “Viva Grass Planner”. Here as an example we use “user_greennet” shape file, which contextually represents the Green Network when uploaded in the “Viva Grass Planner”;
- Schema Type (optional): select NO_TEST.
- Field Map (optional): here you can see the structure of the Target dataset.
- Press Ok. The data (only polygon borders) from your shape file has been transferred to the data structure shape file.

Important: If you have specific attributes in your shape file, that you also want to transfer (not only the borders) into the data structure shape file, before using the “Append” tool, you will need to do the following:
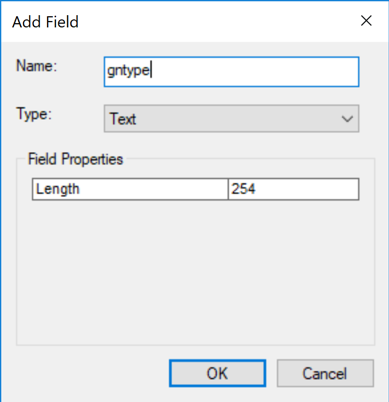
- Create a new field in your shape file, which is the same as in the data structure shape file:
Open the data structure shape file (in this case “user_greenet”) attribute table. There are two fields that can be filled: “gntype” and “importance”.

For this example we take the “gntype”. Right click on the field name and select “Properties”. You can see that the “Type” of the field is String (text) and the Lenght is 254.

Open the attribute table of your shape file (in this case “user_greennet_union). Add a new field with parameters the same as in the data structure shape file (in this case “user_greennet”).
2. Calculate your attribute values to the new field:
Once the new field is added, press right click on it and enter “Field calculator…”.

Press the “Element” two times to write it in text box. We will be using the “Element” field as it contains values for different Green Network elements.

Press “Ok” and the field “gntype” is filled.

3. Follow the steps from above on how to use the “Append” tool. Within Field Map (optional) space you will notice a + sign next to the gntype (Text) field, which means that the Tool has found the same field in both shape files and attribute data can be transferred.
The result is the data structure shape file (in this case “user_greennet” filled not only with polygon (border) data but also with the attribute values in the “gntype” field. The data in this field later can be used for filtering and further calculation operations in “Viva Grass Planner”.

If you only want to use the Viva Grass basemap data, you can use the same “Append” tool to fill the structure
- Custom attribute preparation in ArcGIS for Desktop
Once you have downloaded the data structure shape files, in the shape file “user_asmblock” attribute table you can find custom attributes named “ua1”, “ua2”, …, “ua20” (double and integer type attributes) and “uat1”, “uat2”, …, “uat20” (text type attributes).

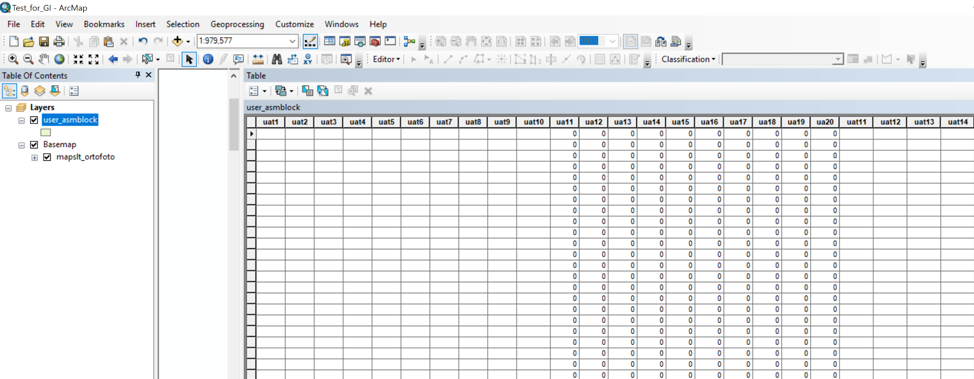
These attributes are “directly” connected to user created attributes in an organization’s account, once the data structure is uploaded into “Viva Grass Planner”.
In the picture below you see attributes “ua1 – ua10” filled in ArcGIS Desktop with values 0 and 1.
In the picture below you can see the same “ua1 – ua9” attributes in the “Viva Grass Planner” user interface (example account on Green Network for Saaremaa island), which can be reached by going to: Viva Grass Planner >> More >> Settings >> User attributes

The picture below shows the same attributes in the Attribute list/Land use blocks Tab in the example account on Green Network for Saaremaa island on “Viva Grass Planner”.

Data can be collected directly in Viva Grass Planner
If user has no data and/or user has no possibilities to upload data to the “Viva Grass Planner” data structure, new objects and their attributes can edited by using Planner’s functionality.
Screens:
You can draw a new polygon or contextual data object directly in the “Viva Grass Planner” interface, by clicking on the “Add new object” button and selecting the type of object you want to draw.

Once you have drawn the new object, you can open the pop-up by clicking on the object. By pushing the “Edit” button you will be able to automatically calculate or manually add values for different attributes.

Once you are done, click the “Save” button to save your entries.

Data upload to the Viva Grass Planner organization’s account
Viva Grass Planner >> more >> Settings >> Upload
Important:
- Data structure must be the same as in downloaded organization’s data structure;
- File and territory size limits;
- Geometry simplification;
- “User area”.
Once you have prepared your data on ArcGIS Desktop, using the “Append” Tool or simply by editing the values of attributes that were there before, you can upload it to the “Viva Grass Planner”. Please follow the steps below:
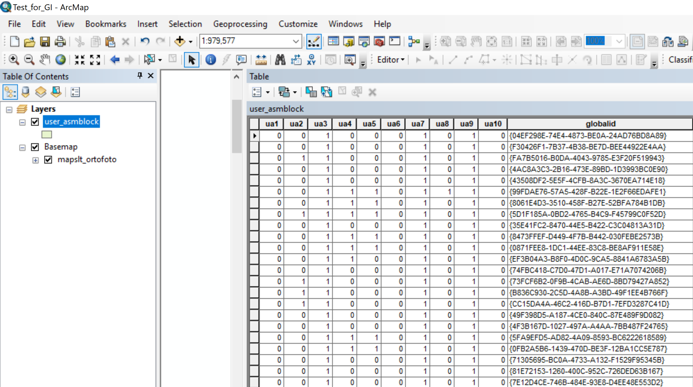
Important: all features in the shape files from the data structure need to be within the borders of the “user_area” shape file. In case features are outside the borders, the layer will not be uploaded into organization’s account and will not be available for viewing and editing. In the picture below you can see that all polygons from the shape file “user_asmblock” are within the borders of the shape file “user_area”.

To upload the data, you will need the “user_area” shape file copied inside the folder of the downloaded data structure as in the picture below:

Now you need to select all shape files of the data structure and zip them into one file called “user_area” as in the picture below:

Once you have the zipped file, you can go to your organisation’s account in “Viva Grass Planner” and to section Viva Grass Planner >> More >> Settings >> Upload as in the picture below:

Press “Select file…”, select the zipped file. Once you have done it, next to the “Select file…” button the name of the file should appear (please be patient as the name appearance depends on the file size) as in the picture below:

Press upload and a spinning “wheel” sing will appear – the uploading is in progress.

Once the upload is done you will see a similar view as in the picture below:

Press “Back” and go to the “Layers” tab to view your uploaded data. In this example I have uploaded the zipped data structure with two filled layers:
- “user_asmblock”, which in the legend on the left is represented as “Agricultural land use”;
- “user_greennet”, which in the legend on the left is represented as “Green network”.
By turning both layers on and zooming in we see the layers displayed on the map as in the picture below: